The way how the changes are replicated in transactional replication (CALL vs SCALL)

As I already mentioned before Replication is using replication procedures in order to replicate data changes  Today I will focus on that how the changes can be send down to subscriber, especially for UPDATE.

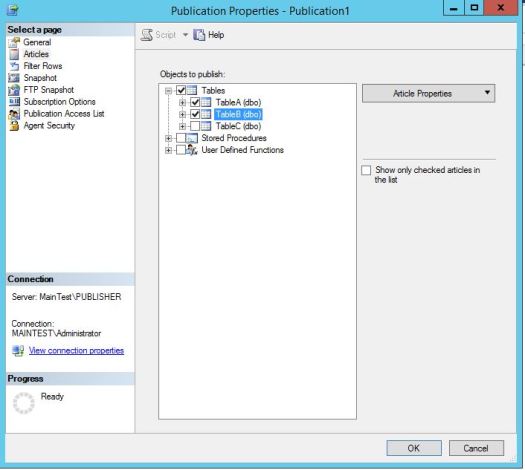
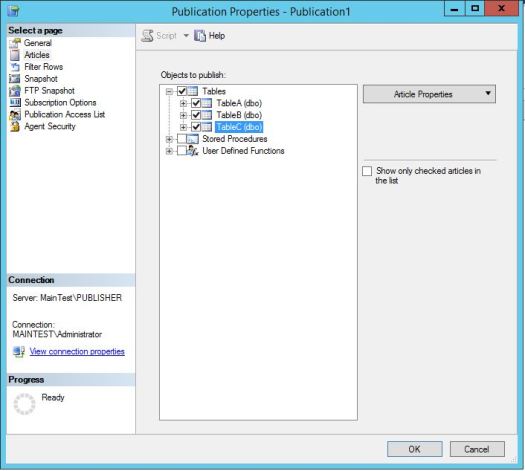
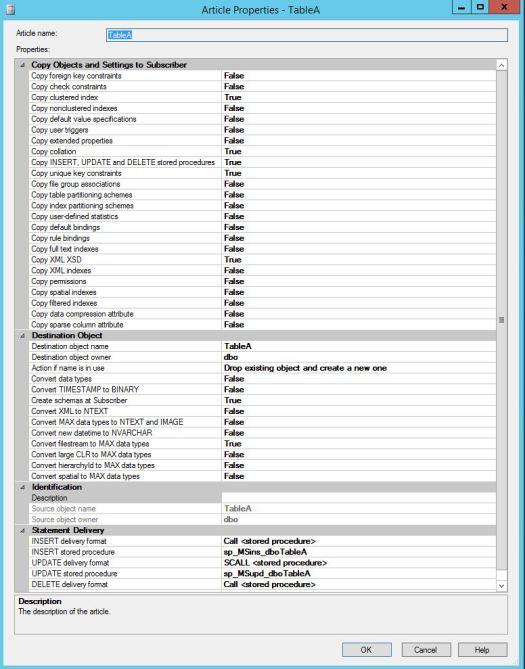
By default these start with sp_MSins_%, sp_MSupd_%, sp_MSdel_%. You may already seen CALL or SCALL associated with these replication procedures. You can see these in GUI under articles properties:

call_articles_grab

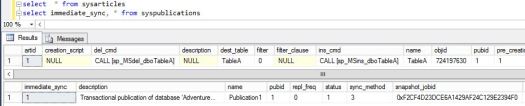
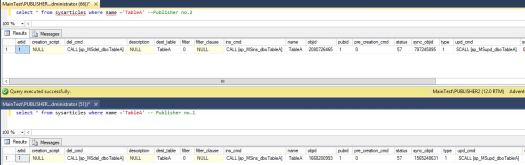
or by just selecting from sysarticles on Publisher db or msarticles on distribution db:

grab_sysarticles

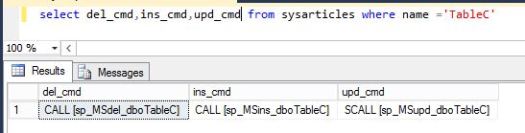
You can change these either by drop down list in SSMS in article properties or by using sp_changearticle stored procedures (executed on Publisher)

The most interesting in that is the UPDATE as that DML you can send down in few different ways. I will focus on two most common ones CALL and SCALL.

Lets go into more detail…

SCALL (default)

SCALL is default setting when you setting up the publication and adding articles into it. The update will pass only columns that have been changed, including PK values and lastly bitmask with information  about what columns has been changed. Here is an example how this looks like in distribution database (Browse replication commands).

Updated one column in TableD:

UpdateTAbleD_SCALL

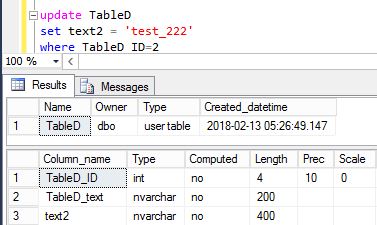
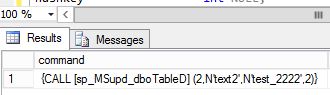
After browsing distribution db we can find this:

TAbleD_SCALL_Browse_with comments

As you can see the first parameter is NULL, this is the column that has not been changed. Here is how the procedure looks like on Subscriber:

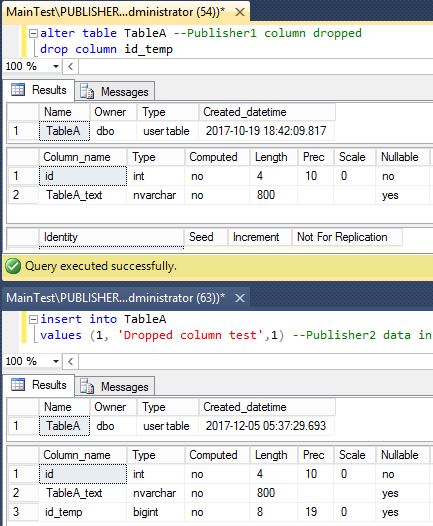
USE [RC] 

go 

/****** Object:  StoredProcedure [dbo].[sp_MSupd_dboTableD]    Script Date: 2/27/2018 6:00:49 AM ******/ 
SET ansi_nulls ON 

go 

SET quoted_identifier ON 

go 

ALTER PROCEDURE [dbo].[Sp_msupd_dbotabled] @c1     INT = NULL, 
                                           @c2     NVARCHAR(100) = NULL, 
                                           @c3     NVARCHAR(200) = NULL, 
                                           @pkc1   INT = NULL, 
                                           @bitmap BINARY(1) 
AS 
  BEGIN 
      DECLARE @primarykey_text NVARCHAR(100) = '' 

      IF ( Substring(@bitmap, 1, 1) & 1 = 1 ) 
        BEGIN 
            UPDATE [dbo].[tabled] 
            SET    [tabled_id] = CASE Substring(@bitmap, 1, 1) & 1 
                                   WHEN 1 THEN @c1 
                                   ELSE [tabled_id] 
                                 END, 
                   [tabled_text] = CASE Substring(@bitmap, 1, 1) & 2 
                                     WHEN 2 THEN @c2 
                                     ELSE [tabled_text] 
                                   END, 
                   [text2] = CASE Substring(@bitmap, 1, 1) & 4 
                               WHEN 4 THEN @c3 
                               ELSE [text2] 
                             END 
            WHERE  [tabled_id] = @pkc1 

            IF @@rowcount = 0 
              IF @@microsoftversion > 0x07320000 
                BEGIN 
                    IF EXISTS (SELECT * 
                               FROM   sys.all_parameters 
                               WHERE  object_id = Object_id('sp_MSreplraiserror' 
                                                  ) 
                                      AND [name] = '@param3') 
                      BEGIN 
                          SET @primarykey_text = 
                          @primarykey_text + '[TableD_ID] = ' 
                          + CONVERT(NVARCHAR(100), @pkc1, 1) 

                          EXEC Sp_msreplraiserror 
                            @errorid=20598, 
                            @param1=N'[dbo].[TableD]', 
                            @param2=@primarykey_text, 
                            @param3=13233 
                      END 
                    ELSE 
                      EXEC Sp_msreplraiserror 
                        @errorid=20598 
                END 
        END 
      ELSE 
        BEGIN 
            UPDATE [dbo].[tabled] 
            SET    [tabled_text] = CASE Substring(@bitmap, 1, 1) & 2 
                                     WHEN 2 THEN @c2 
                                     ELSE [tabled_text] 
                                   END, 
                   [text2] = CASE Substring(@bitmap, 1, 1) & 4 
                               WHEN 4 THEN @c3 
                               ELSE [text2] 
                             END 
            WHERE  [tabled_id] = @pkc1 

            IF @@rowcount = 0 
              IF @@microsoftversion > 0x07320000 
                BEGIN 
                    IF EXISTS (SELECT * 
                               FROM   sys.all_parameters 
                               WHERE  object_id = Object_id('sp_MSreplraiserror' 
                                                  ) 
                                      AND [name] = '@param3') 
                      BEGIN 
                          SET @primarykey_text = 
                          @primarykey_text + '[TableD_ID] = ' 
                          + CONVERT(NVARCHAR(100), @pkc1, 1) 

                          EXEC Sp_msreplraiserror 
                            @errorid=20598, 
                            @param1=N'[dbo].[TableD]', 
                            @param2=@primarykey_text, 
                            @param3=13233 
                      END 
                    ELSE 
                      EXEC Sp_msreplraiserror 
                        @errorid=20598 
                END 
        END 
  END --  

You can see how bitmask is used to determine if the column actual changed or no.

CALL

First thing lets change SCALL to CALL of TableD. You can do it in SSMS by going to Publication Properties and then to Article properties or just run T-SQL like that one:

exec sp_changearticle 
@publication ='Publication1',
@article = 'TableD',
@property ='upd_cmd',
@value='CALL [sp_MSupd_dboTableD]',
@force_invalidate_snapshot=0

After you run this you do not need to run snapshot. New update procedure will be delivered as normal replicated commands and now the code for update procedure looks like this:

create procedure [sp_MSupd_dboTableD]     @c1 int,     @c2 nvarchar(100),     @c3 nvarchar(200),     @pkc1 int
as
begin   	declare @primarykey_text nvarchar(100) = '' if not (@c1 = @pkc1)
begin  
update [dbo].[TableD] set     [TableD_ID] = @c1,     [TableD_text] = @c2,     [text2] = @c3
	where [TableD_ID] = @pkc1 if @@rowcount = 0
    if @@microsoftversion>0x07320000
		Begin
			if exists (Select * from sys.all_parameters where object_id = OBJECT_ID('sp_MSreplraiserror') and [name] = '@param3')
			Begin
				
				set @primarykey_text = @primarykey_text + '[TableD_ID] = ' + convert(nvarchar(100),@pkc1,1)
				exec sp_MSreplraiserror @errorid=20598, @param1=N'[dbo].[TableD]', @param2=@primarykey_text, @param3=13233 
			End
			Else
				exec sp_MSreplraiserror @errorid=20598
		End end   else
begin  
update [dbo].[TableD] set     [TableD_text] = @c2,     [text2] = @c3
	where [TableD_ID] = @pkc1 if @@rowcount = 0
    if @@microsoftversion>0x07320000
		Begin
			if exists (Select * from sys.all_parameters where object_id = OBJECT_ID('sp_MSreplraiserror') and [name] = '@param3')
			Begin
				
				set @primarykey_text = @primarykey_text + '[TableD_ID] = ' + convert(nvarchar(100),@pkc1,1)
				exec sp_MSreplraiserror @errorid=20598, @param1=N'[dbo].[TableD]', @param2=@primarykey_text, @param3=13233 
			End
			Else
				exec sp_MSreplraiserror @errorid=20598
		End end  end   -- 

As you can see no bitmap mask just simple update to ALL columns in tables and proc does not check if values has changed.

Now lets see how the update looks like in the distribution db. As before we just updating one column in that table:

update TableD
set text2='test_2222'
where TableD_ID=2

If you check distribution database you will see this:

CALL_browse

As you can see it does provide all columns and values even if these has not changed. It will always send everything.

CALL vs SCALL

Now you wonder why this is important? Imagine you have large table with 30 columns some big ones like varchar(max) etc. Your application updating only one column in that table…. How do you think this will affect your distribution db? Lets have a look.

I cleaned up distribution db and will populate 10 column table with 1 million rows. Then update that 1 million rows first with SCALL and then with CALL settings.

Table Structure looks like that:

CREATE TABLE [dbo].[TableA](
	[TableA_ID] [int] NOT NULL,
	[Col1] [nvarchar](100) NULL,
	[Col2] [nvarchar](100) NULL,
	[Col3] bigint NULL,
	[Col4] int NULL,
	[Col5] int NULL,
	[Col6] int NULL,
	[Col7] datetime NULL,
	[Col8] int NULL,
	[Col9] bigint NULL,
	[Col10] [nvarchar](max) NULL,
PRIMARY KEY CLUSTERED 
(
	[TableA_ID] ASC
)WITH (PAD_INDEX = OFF, STATISTICS_NORECOMPUTE = OFF, IGNORE_DUP_KEY = OFF, ALLOW_ROW_LOCKS = ON, ALLOW_PAGE_LOCKS = ON) ON [PRIMARY]
) ON [PRIMARY]

GO

After creating I will populate table with random data and then publish it. Once Snapshot of TableA wth 1 million rows delivered to Subscriber I am checking space  of msrepl_commands on distribution database for that Publication (nothing else is getting into that distribution db at this point).

Snapshot delivered

Right now msrepl_commands is 35 rows and 40KB reserved. It contains only initial snapshot. Article is set to use SCALL for updates. Lets send now 1 million updates just for one column, Col4 which is just INT. I will increase that column by number 100 that is it.

1 million SCALL updates sent down

After sending 1 million updates with SCALL my msrepl_commands table went to: 1000035 rows and 183368 KB reserved for that table.

Lets change article to normal CALL and lets send 1 million updates for Col5.

1 million CALL updates sent down

Now my msrepl_commands table went to 2000088 rows and reserved 759624 KB on drive. Just to explain why row count is not 2000035… it is because I changed article using sp_changearticle which added few rows still very small ones (should not take more than 40 KB)

Summary

As you can see using normal CALL will take way more space inside your distribution db

CALL = 576 256 KB

SCALL = 183 328 KB

Same transactions but with CALL we are using almost 3 times more of storage space. Before you change default SCALL setting to CALL think twice and check storage on your distributor.

If you have any questions just use comments section.

Did you use CALL in some cases and if yes to what were these? What setting do you normally use for UPDATES?

Immediate_sync on vs off

This is one of the settings that can cause issues with growth of your distribution database or when running Snapshot. It is FALSE by default and it can be set on Publication level. You can check what setting you have by checking syspublications on published database or mspublications on Distributor and distribution database. Let me try to explain what impact have that setting to your replication setup. We are assuming your distribution retention is not “fixed set” like this @min_distretention=48, @max_distretention=48 but more like this @min_distretention=8, @max_distretention=48. More about how this works in the following post.

TRUE

Normal behavior when your retention is set to min=8 and max=48 will be that transactions that been delivered to subscribers and are older than 8 hour will be removed by distribution cleanup. However that changes with Immediate_sync set to ON. The transactions will be kept (even if delivered) until get older than 48 hours. Also it matters when you adding new subscribers. If Snapshot was generated within last 48 hours and you add subscriber it will use existing snapshot and deliver all the transactions that were marked for replication after snapshot generation. Here is an example.

We have Publication1 with TableA as an article and it is published to Subscriber, Subscriberdb database.

Initial_setting

Snapshot was generated within that 48 hour period and two rows added to TableA on Publisher.

Snapshot

Inserts

We are planning to add new subscription stream to same subscriber but to Subscriberdb_2 database. After the creation you do not need to run Snapshot again it will use old Snapshot and all transactions that been delivered afterwards.

New subscription_ON

You can see that it used old Snapshot as TableA has 0 rows (we inserted 2 rows before creating new subscription) and once you select from TAbleA on Subscriberdb_2 you will find two rows. These been delivered as normal replication transactions.

subsriber_select.JPG

From my perspective there is one downside of that setting, especially when you are planning to add new articles quite often. Every time you add new article and want to send a snapshot of these new articles down to subscribers the Snapshot Agent will generate a snapshot for ALL articles with that Publication. In other word last Snapshot has been invalidated.  Lets add TableB to that Publication1 and lets run snapshot.

adding_newarticles_on.JPG

The Snapshot will generate two articles:

new_snapshot_newarticle_on.JPG

However existing Subscribers will send down only new articles TableB:

Subscription_new_article_on.JPG

The generation of Snapshot for ALL tables could be problematic when you publishing hundreds of large tables already. Adding one article will generate new snapshot for all of these tables and from my experience it will generate some locks on Publisher especially if Publisher is very busy.

Lastly the snapshot will be generated no matter if you add new articles or not. If someone will kick off snapshot by mistake it will still do snapshot for entire publication.

Lets have a look how it looks if this setting will be set to FALSE.

FALSE

First thing will be that will be different is that you will need to generate full snapshot every time you adding new subscription.

Second thing that will change is when your retention is set to something like that @min=0 and @max=72. All transactions that have been delivered will be cleaned up on the next Distribution Cleanup job run.

Third difference is that when adding new articles to existing publication the next snapshot run will generate ONLY files for new articles. Lets have an example.

First we changing setting to FALSE by running sp_changepublication:

changingto_false

Now lets add TableC into Publication1:

addingTableC

and run snapshot:

snapshot_with_false

As you can see Snapshot has been generated only for one Table, TableC. That is quite convenient especially when you adding one table into publication that already have hundreds of other tables.

Which settings you should choose? As always it depends on your environment. How often you adding article into Publication? How much space you have on your distributor? How busy is your Publisher? Can you afford of running snapshot for entire Publication?

sp_msUpd% has too many arguments, sp_msUpd% expects parameter. Replication Procedures part 2

In previous post I explained basics of replication procedures. Now lets have a look into some common issues with these. Especially when you Publishing from two (or more) sources, same tables  into the  same destination (Subscriber).

Here is an example:

Twopublishers_articles

As you can see both articles from two different Publishers are using exactly same procedure. If you check Subscriber you will see only 3 (not 6) procedures for that table:

Subscriber_procs

In that specific scenario you need to be careful with any changes to schema on Publisher. Why? …..

Lets assume you have Subscriber that is getting data from two (or more) different sources (Publishers). TableA on Subscriber getting data from Publisher1 and Publisher2. By default replication procedure names will have the same name “sp_Msupd_dboTableA” , that means both publishers will be using exact same procedure for insert, updates and deletes. You are receiving request from DEV to modify that table. To be exact drop  a column. If you deploy change to Publisher1 only the replication procedure will be changed and new version (without dropped column) of the procedure will be applied on subscriber. The new procedure wont have that old column… but what about Publisher2? Publisher2 will be trying to execute procedure still with old column  and you will receive “Procedure or function sp_MSins_dboTableA has too many arguments specified.”.

Here is an example. We dropped column id_temp on Publisher1 and then inserted one row on Publisher2:

Column dropped

Once we did that Distribution agent for Publisher2 will start failing:

Dropped column error

How to solve it and/or how to prevent it to happen?

Solution

Once you get to that point when receiving such error you should follow these steps:

  1. Apply change (in our case drop column) on the second Publisher. This wont solve the issue straight away but it will modify replication procedure code to the same as we have on Publisher1. The DDL change will wait in the queue for delivery.
  2. As procedure on Subscriber has 2 instead of 3 parameters we need to modify that procedure manually and include 3rd parameter. modifying proc
  3. Completing Step 2 will cause any inserts coming from Publisher1 failing as modified procedure expect @c3, meanwhile Publisher2 will deliver command that was failing before. You can also set default NULL value in the proc @c3 bigint=NULL and this wont cause error on Publisher1error_publisher1
  4. Wait until change from Step 1 will be replicated down to Subscriber. It will change back procedure to version without old procedure. This will automatically fix distribution agent that will be failing (Step 2). Both Publisher will have same schema and same replication procedure code for that table.

Similar step you need to follow if u add  new column to replicated table. Just instead of adding parameter you need apply old procedure (without new column) from second Publisher (Scripting out Replication Procedures).

Preventing it

You can prevent it to happen in two ways.

  1. While you are configuring Publication. When you are adding articles to Publication you can specify INS/UPD/DEL procedure names. Just use different names for Publisher1 and Publisher2. Below you can see that both are using different procedures.Replication_procs_changed
  2. You can always modify procedures names by using sp_changearticle procedure on a Publisher. However if are receiving error on distribution agent already, this change wont help as we are using Transactional Replication the “change article” will be in the queue behind the failing command. You need to be proactive and do that change before error occur. Here is an example of modifying Insert procedure:    exec sp_changearticle
    @publication=’Publication2′,
    @article=’tableA’,
    @property=’ins_cmd’,
    @value=’CALL sp_MSins_TAbleA_Publisher2′

Now important thing is that you can’t prevent this issue to occur for dropped columns as the old procedure (from second Publisher) will try to insert data into old column anyways and column will be missing. If so happens follow the steps I provided in that post.

The Best way to avoid issues with replication procedures is working closely with DEV when doing schema changes and configure you publications as mentioned above.

How to create new Subscription?

We already covered Configuring Distributor and Publisher as well as Creating Publication . Now there is time to tell more about creating Subscriptions. As always you can create it by using GUI or T-SQL. In this post I will cover GUI setup of new subscriptions.

We already created Publication and we are ready to create subscription. Go to Replication tree on Publisher and extend it. Right click on Publication and choose New Subscriptions:

New subscriptions

Wizard will Open and you will need to choose under what publication you want to create new subscription:

choose publication

Now you will need to choose if the subscription will be Push or Pull. The main difference is where the Distribution Agent will be located. Pull -> Distribution Agent will be located on Subscriber, Push -> Agent will be located on Distributor. More about PUSH vs PULL I will cover in separate post.

PushorPULL

In next window you will need to choose the new subscriber. Note: you can create in that window Multiple subscriptions. You can add more than one server (!) which is pretty great if you need to send same data to multiple subscribers:

Choose subscriber

At this point you will make first connection to the subscriber there are two things you need to keep in mind. 1st You need to have access to that server from the place you creating the subscription.  2nd you need to use same or higher version of SSMS than your Subscriber is… otherwise u will get an error (more about this here: The selected Subscriber does not satisfy the minimum version compatibility level of the selected publication. ) Both conditions are not needed when using T-SQL.

Once you connect to subscriber you need to choose subscriber DB:

Subscriberdb

Next window is Security Settings for Distribution Agent. As always you need to choose processing account. That is the account that distrib.exe will be running under (more about this here: Understanding Replication Agents). Second, how this agent will connect to Distributor and third is the account that will be used to connect to Subscriber. If Processing account don’t have permissions to subscriber or Subscriber is in different domain just use SQL Authentication (or grant permissions if possible).

Security1Security2

In next step you need to decide if the Distribution Agent should run continuously or not. In 99% cases you want to run continuously (for some reason you using Transactional replication). It pretty much means that Agent will be running all the time and will be started every time SQL Agent will start.

continously

Last step is to choose if you want to initialize Subscription and when. Initialize means new snapshot will be generated (or not if using Immediate Sync) and schema/data will be synced to subscriber. If you choose not to, the agent wont send ANY schema and start replicate data from the point when subscription will be created. The only thing that Distribution Agent will “sync” will be replication procedures. Those will be delivered before any data. Replication Procedures will be always send down in either option (if initialize then replication procs will be included in snapshot).

You can also choose if initialization will be done later (when snapshot agent will be started) or Immediately (means snapshot will be kicked off as soon as Subscription will be created).

Initilize

Last window you need to decide that either Subscription will be created or just script generated (or both).

Create

It is good practice to save the script as it is bit easier later if you want to re-create or create more same subscriptions.

Once you finished wizard you will see the Subscription under Publication that you choose at the beginning. In next post I will describe more how to create subscirption by using T-sql. Using T-SQL u have a bit more control over the settings and you avoiding few issues that can occure when setting up by using SSMS.

The selected Subscriber does not satisfy the minimum version compatibility level of the selected publication.

As you may know SQL Replication can replicate data between different versions of SQL. It can replicated data from SQL 2012 to SQL 2016 etc. It can also replicate data from higher version to a lower version of SQL. However if you are trying to setup replication to a subscriber that is on higher version than your publisher you may get following error:

“The selected Subscriber does not satisfy the minimum version compatibility level”

Now the problem occurs only when you are adding a new subscriber using GUI and it is related only to version of SSMS you are using during setup.

Lets assume you are configuring subscriber that is on 2016 but your publisher and distributor is on 2012. You most likely connected to a Publisher and trying to add new subscription stream.

You have two solution for this:

  1. Use T-sql. When setting up by using T-SQL, the version of subscriber is not being checked as you are not even trying to connect to a subscriber. Only Distribution agent will connect to it later after the setup.
  2. As T-SQL setup could be bit difficult you have a second solution, which is to use tools that are on the same version as subscriber (in our example it should be SSMS 2016). You can do it either from Subscriber or other server. NOTE: The tools/SSMS should be located on workstation/server that have access to Publisher/Distributor and Subscriber. you need to have access to all 3 components of replication.

If you have other solution for this issue let me know in comments:)

How to setup Transactional Replication? Part 2 (Publications and articles)

In Part 1 we covered configuring Publisher and Distributor server. Now you are ready to create first publications and add articles. We will focus on doing this by using SSMS.

Publication

First step is to create Publication on a database that you want to publish. Since you already setup Publisher and Distributor you should be able to extend Replication tree and Right Click on Publication, choose New Publication:

NewPublication

This will open new Publication Wizard:

NewPubwizard

On the Next window you will need to choose which database you want to publish. This will enable given database for Publishing:

Choosingdatabase

In next step you need to choose type of replication. We focusing only on Transactional Replication and we choosing that one:

ReplicationType

Now you need to choose articles. You can choose Tables, Procedures, Functions etc. In my DB I have only Tables:

ChoosingArticles

You can extend each Table to get column list and you can “filter” it vertically by removing some columns from replication. You don’t need to replicate entire table schema.

On the right side you have Article Properties button. You either set Properties for highlighted article or for ALL articles in this Publications. The list of the settings is quite impressive.

Articles Properties

You can decide if you want to copy triggers, all indexes, if table will be dropped on subscriber, choose if you want to send deletes or not etc. There are plenty of settings that you can modify. Choose wisely as some of these settings can invalidate snapshot and you will need to re-snapshot publication. As there are so many of these properties I will go describe it more in separate post.

In next step you can “filter” articles horizontally by adding WHERE condition. For Example you want to replicate only new data then you can set condition on date column etc.

FilteringRows

As you can see amount of properties and configurations that you can use are making replication very flexible:)

In next step you need to decide when Initial Snapshot will be run. If you don’t want to choose anything, you can always run it manually from replication Monitor. You can either schedule Snapshot or choose to generate snapshot straight after publication will be created:

Snapshot

Next step is to configure Security settings for LogReader and Snapshot agent:

SecuritySettings

I already explained (Understanding Replication Agents Part 1 , Understanding Replication Agents Part 2 ) How Replication Agents work. In that place you configuring Processing Account (under what account jobs and exec will be running) and what account will be used in order to connect to Publisher. You can setup different account for LogReader and Snapshot. You also need to keep in mind that account that will be used to connect to Publisher need to have relevant permissions (sysadmin) on Publisher. That account will be generating Snapshot and reading transaction log on Published database.

SecuritySettings

For this example I choose for both SQL Service account. NOTE: I needed to grant permission for Distributor (if remote one) SQL service account on Publisher. If you choosing different processing account for Snapshot than SQL service account, you need to make sure that this account have permissions do file system on Distributor. Snapshot agent will be creating folders and files on disk. SQL Service will have that permissions but if you use different account you may have issues when generating snapshot.

In next step you can choose that either Publication will be created or just generate the script for the Publication you just configuring (or both):

Createorscript

It could be useful to save T-Sql script as it may me useful in future. It is also nice to see what exactly happen when you configuring Publication (as there are many procs executed and configuration changed during that process that you do not see when using SSMS).

Finally we can put name of our Publication and Finish configuration:

Naming Publication

If all went well you will see new Publication in your SSMS:

Completed

DonePublication

This is pretty much entire process of creating basic publication for Transactional Replication. Easy?? Yeah it is easy we will go bit “deeper” in next post.

In next posts will describe some of the articles settings that you can modify, creating subscriptions and configuring Publications/Subscriptions by  using T-sql.

Configuring distributor and publisher with T-SQL

I already described how to configure distributor and publisher by using GUI.

How to setup Transactional Replication? Part 1

However if you have to setup more than one publisher  to setup and also multiple distributors (or distribution dbs) it is getting quite hard to do it quickly. I often you one remote distributor server and multiple distribution dbs on that one server. That below script helped me a lot.  By default I set retention to 48 hours and 24 hours for history. You can change it in the script or later by using GUI. Script will also generate code that you need to run on Publisher server in order to enable Replication and configure distributor.

Note: It will try to create a folder, if parameter @create_folder set to 1, otherwise it will create db in default or provided path. Still if you want to create folder for new distribution database xp_cmdshell need to be enabled on the server.

If you have any improvements or comments to below script let me know.

/* NOTE: 
1.You need to run the script for EACH distribution db u want to create
2.Model db cant be in use during the installation (It need exclusive lock on model in order to create distribution db)
*/
/****** Installing the server as a Distributor.  ******/
use master

declare @distribution_Db nvarchar(300),
@path nvarchar(300),
@SQL nvarchar(max),
@publisher nvarchar(300),
@password nvarchar(300),
@distributor nvarchar(200),
@create_folder bit

-------------- setting variables ------
set @distributor=@@servername
set @distribution_db=''
set @password=''
set @publisher=''
set @path =NULL -- leave null if u want to create distribution db in this forlder: 
--select substring(physical_name,1,patindex('%tempdb%',physical_name)-1) from sys.master_files where database_id in (select database_id from sys.databases where name='tempdb') and file_id =1
set @create_folder =1 --xp_cmdshell need to be enabled otherwise distribution db will be created in default folder. Set to 0 if you created folder manually.
-------------- end of variables --------

--Configuring Distributor
if not exists (select 1 from sys.servers where is_distributor=1 and name ='repl_distributor' and data_source=@distributor)
BEGIN
exec sp_adddistributor @distributor = @distributor, @password = @password
END

if @create_folder =1 and @path is NULL

BEGIN
		select @path=substring(physical_name,1,patindex('%tempdb%',physical_name)-1) from sys.master_files where database_id in (select database_id from sys.databases where name='tempdb') and file_id =1
END

if @create_folder =1 and @path is not NULL
	BEGIN
		set @path = @path + @distribution_Db
set @sql = 'exec xp_cmdshell ''mkdir '  +@path +''''
print @sql
if @create_folder =1
	BEGIN
	 if exists (select 1 from sys.configurations where name ='xp_cmdshell' and value_in_use =1)
	 BEGIN
	 
	print 'Creating Folder  ' + @path
	exec sp_executesql @sql
	END
	ELSE
	BEGIN
	print 'xp_cmdshell not enabled. Db will be created in default folder'
	set @path =NULL
	END
	END
END


-- Adding the distribution databases
if @path is not NULL
set @path = @path + '\'

if @path is NULL
print 'Distribution db will be created in default folder'


if not exists (select 1 from sys.databases where name =@distribution_db)
BEGIN
exec sp_adddistributiondb @database = @distribution_db, 
@data_folder = @path, 
@log_folder = @path,  
@min_distretention = 48, 
@max_distretention = 48, 
@history_retention = 24, 
@security_mode = 1
END


-- Adding the distribution publishers
exec sp_adddistpublisher @publisher =@publisher,
 @distribution_db = @distribution_Db, 
 @security_mode = 1, 
  @publisher_type = N'MSSQLSERVER'

/****** End: Script to be run at Distributor ******/


select 'Execute on publisher ' + @publisher
select 'use master 
exec sp_adddistributor @distributor = ''' + @distributor + ''' , @password = '''+ @password +''''

Understanding Replication Agents Part 1

3 Musketeers …LogReader, Snapshot, Distribution

First two (Logreader and Snapshot) are directly impacting Publisher. First is to read the log, find replicated transactions and put it into distribution database. Snapshot is used to make snapshot of schema, indexes, constraints, data etc. It will generate schema, bcp files on distributor (folder that the snapshot will be generated is configurable).

Last one, the Distribution agent is responsible for delivering the data that Logreader or Snapshot generated. In my experience the most issues we have is with this agent.

These three agents are actually SQL Jobs and you can start/stop and manage it in few ways. Trough replication monitor, by right clicking on Publication (View Sanpshot/Logreader status) or Subscription (View synchronization Status) and Job Activity Monitor (on distribution server).
Job naming convention is exactly the same for Types of Agents. Snapshot will have publisher name,published db name, publication name. Log Reader will have only publisher name and published db name. Distribution Agent will have publisher name, published db name, publication name, subscriber name.

REplication_Agents_jobs

In all three cases if the names are too long some strings will be truncated. Also the number at the end of each job name is the “agent id” and it is matching the id in system tables in distribution database.

Because Im dealing with quite big volume of  replication agents I often like to use job Activity monitor to manage my agents. You will notice that after configuring publisher/distributor and creating your first publication/subscription in Job Activity Monitor you can find new Categories of jobs. All replication related jobs has “REPL-” prefix.

  • Repl-Snapshot
  • Repl-Distribution
  • Repl-Logreader
  • Repl-Distribution Cleanup

new_job categories

You can easily filter these and if you ever need to start/stop multiple agents you can do it that way. Very useful when you want to change agent profiles  on multiple agents and in order to new profile start working you need to restart the agent.

Last thing about this is the job history often gives you better information about errors occurred than Replication monitor. If you need more details about error always check job history of given agent.

As mentioned before you can also use Replication Monitor (right click on Replication tree) to manage your agents. If you using Replication Monitor for the first time you need to register your publishers first in order to see it on the tree list on left pane. You can either register the publisher one by one or add entire Distributor. This is useful thing when you using one distributor for many publishers is to choose Add Distributor (Specify a Distributor and add Its Publishers…)

registering new distributors

By doing it, you will add ALL Publishers that are using that distributor. The Replication Monitor connects only to Distributor and you don’t need the direct connection to Publisher. The agents in Replication Monitor are split between the tabs like Subscriptions Watch list and Agents. In Subscriptions you will find all your subscriptions for give publisher and you can drill down to given publication on left pane if needed. In Agents tab you will find all Snapshot, LogReader agents but by default you will see LogReader agents and if you want to Snapshot you need to use drop down list to see other ones. What is nice with Replication Monitor is that you can go directly to the SQL job settings/history on distributor. You just need to choose agent, choose Action and from there Job Settings. It will open normal job properties window as you getting by using Job Activity Monitor (note: This wont work if you connected to distributor and you are using pull replication).


How to setup Transactional Replication? Part 1

Distributor:

The main part (and 1st step) of the setup is configuring Distributor. Either it can be located on the same instance as a publisher (not recommended as it will add some load to your Publisher) or configure as remote distributor.
As always you can do this using GUI or T-SQL.

For purpose of this article I created three named instances, PUBLISHER, DISTRIBUTOR and SUBSCRIBER. Remember that anytime you want to work on Replication you need to connect to full named instance name (in my Case MainTest\Distributor etc.)

First step is enable distributor on the instance that will be running as a Distributor.
Using GUI,  go to Replication  in SSMS, right click and choose Configure Distribution from there you will be moved to Distribution Wizard.
After first page u need to choose “<server name> will act as its own distributor, SQL Server will create a distribution database and log” It will create default distribution database on that instance and enable also this instance as a Publisher. Later on if u decide to use different distribution db (or create multiple distribution dbs) you can remove that default distribution db.

Configuredist_1

Then choose path where the snapshot will be located. Check if there is enough space on that drive as some full snapshots of all your published articles can be very big.

configuredist_2

Next you will need to provide a distribution db name and path to the distribution db data file and log file. Same as you creating any new user db. On the next page this distribution db will be automatically Mapped to the publisher instance (which in this case will be your distribution name). You can also choose how Distributor will authenticate with Publisher. In most of the cases you will use Windows auth and the SQL Service account (or dedicated AD account). This will end of the Distributor configuration.

configure_distributiondb1

Configuredist_3
Now when right clicking on Replication tree you will have 3 new options.
When choosing Distributor Properties you can modify :
-distributor setting (like retention period etc.)
-dropping/creating distribution
-mapping publishers to given distribution db
-managing Agent Profile Defaults (here you can change profiles for every agent on distributor)
Now we want to configure distributor for our MainTest\Publisher instance. In order to do this first we need to configure new (or use existing one) distribution db under Distributor Properties. We already have one default distribution db on that instance however for purpose of this article we will create new one.
After clicking “New” you can change database name, database paths and retention period.
I strongly suggest if you have enough disk space set this as a fixed range (min and max on same value). Later on it can save you some work. If you leave default setting (0-72 hours) the transactions that been delivered to subscriber will be removed straight away during next distribution cleanup run also it will remove any transactions older than 72 hour (does not matter if delivered or not).
If you set fixed values lets say Min = 48 hour and Max=48 hours. In this case Cleanup will remove only transactions older than 48 hours. It will NEVER remove data that been inserted within last 48 hours. In some cases it can save u lots of work as you can manipulate with LSN of replication transactions in order to set back the replication in time (will write about this bit later). In our case it works as kind of “DR” solution (not often but still).configuredist_4

After creating new distribution db on the left pane go to “Publishers” and add new one, connect to it and map it to correct distribution database. On the same page SQL will ask u to provide a password for user that Publisher will use to connect to Distributor. Save this password as it will be used for EACH Publisher that will use that remote distributor.

configuredist_5

Publisher:

Last part of configuration is to go to Publisher and point it to configured distributor by providing a password that will be used to connect to Distributor.
Right click on Replication component and choose configure distribution. You will get same Wizard as before on Distributor however on 2nd page choose second option and point it to your distributor. Next page will ask you for password that you set in previous step.

configure_publisher_1

publisher2

publisher3
Once this wizard is completed you good to start creating publications and sending it to subscribers. But this I will cover in next article.


Other way to get this done is by using T-SQL. It is much quicker especially when you need to setup few of these.

How to do it? I will show it in next blog post.

Configuring distributor and publisher with T-SQL